
These art activities use a variety of skills perfect for your little learners! They use a combination of materials perfect for developing different skills, including using scissors, glue, and paper punchers.
Most importantly, these activities are fun for kids and allow them to be creative in what they create!
If you don’t want to create Easter eggs, many of these can be modified to create bird eggs, instead!
This post may contain affiliate links. As an Amazon Associate and participant in other affiliate programs, I earn a small commission on qualifying purchases (at no additional cost to you). Thank you for your support! Read our affiliate disclaimer here.
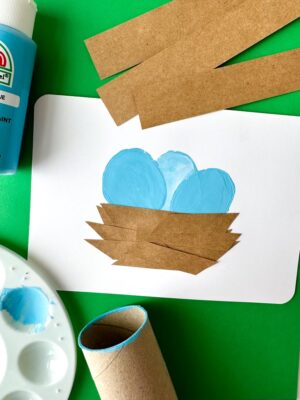
Create an egg stamp using a toilet paper tube
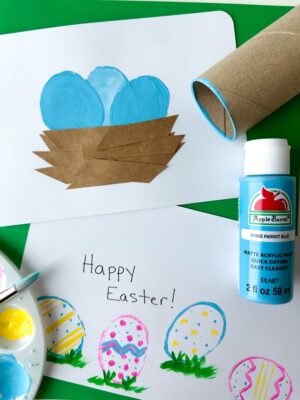
Materials:
Paint (acrylic or washable)
Cardboard toilet paper roll
White cardstock
Paint brush
Paint tray
Steps:
1. Use a paint brush to apply paint to the end of the TP roll. Or “stamp” the TP roll into the paint to apply it.
2. Gently squeeze the TP roll to create an oval shape and firmly press the TP roll onto the cardstock.
3. Repeat to create more eggs.
4. Use paint to decorate the inside of each egg to create decorated Easter eggs. Or paint the eggs to create bird eggs.
5. [Optional]. Make a nest by cutting strips from brown paper (like Kraft paper) and gluing onto the cardstock.
Decorate paper Easter eggs using washi tape
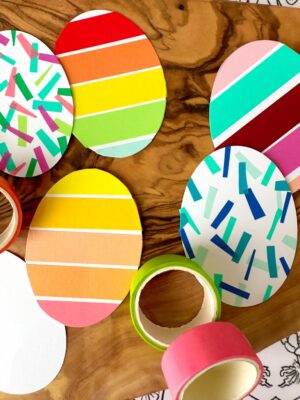
Materials:
Cardstock
Colorful washi tape
Oval paper puncher (optional)
Steps:
1. Cut egg shapes out of cardstock paper. (Use an oval paper puncher to easily create egg shapes.)
2. Cut strips of colorful washi tape.
3. Place tape on eggs to decorate!
Create Easter egg prints using a sponge
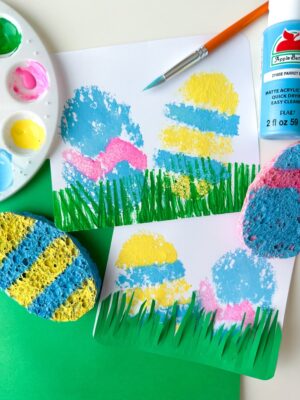
Materials:
Paint (acrylic or washable)
White cardstock
Sponge
Paint brush
Paint tray (simple paint palette)
Green paper (optional)
Fork (optional)
Steps:
1. Cut a sponge into the shape of an egg.
2. Use a paint brush to apply paint to the sponge.
3. Firmly press the painted sponge onto the cardstock and carefully pull up to reveal the print.
4. Repeat to create more eggs.
5. Create grass by dipping a fork in green paint and firmly “stamping” the paper. Or create grass using green paper – cut to create fringe and glue to the cardstock.
Create simple Easter eggs using paper scraps

Materials:
Colorful printer paper
Cardstock
Scissors
Glue
Steps:
1. Cut an egg shape out of cardstock.
2. Using the colorful paper, cut strips of paper and have your child cut the strips into smaller squares.
3. Glut the colorful paper squares onto the cardstock to decorate your egg!
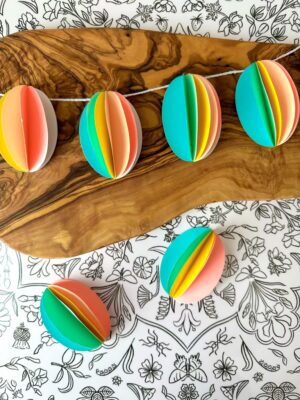
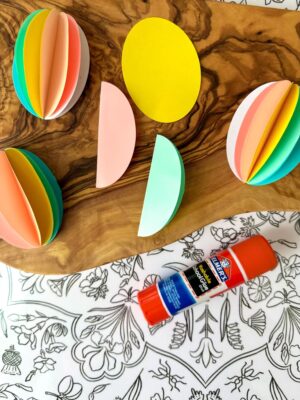
Create a 3D Easter egg garland using paper
Materials:
Colorful printer paper
Glue stick
String
Hot glue
Oval paper puncher (optional)
Steps:
1. Cut oval shapes out of colorful printer paper. (Use an oval paper puncher to easily create egg shapes.)
2. Fold each oval in half.
3. Take two ovals and use a glue stick to glue one half of each oval together.
4. Repeat this step, gluing approximately 8-10 ovals together.
5. To create a garland, hot glue your 3D eggs onto twine.
6. Hang to display!
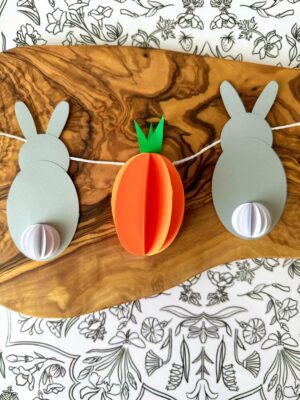
7. Use orange paper to create carrots and simple shapes to create a bunny garland. (See photo below)
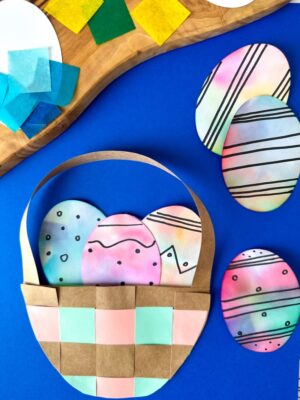
Decorate paper eggs using bleeding tissue paper
Materials:
Bleeding tissue paper
Permanent marker
White cardstock
Brown paper (like Kraft paper)
Oval paper puncher (optional)
Steps:
1. Cut egg shapes out of cardstock. (Use an oval paper puncher to easily create egg shapes.)
2. Use a permanent marker to draw designs on your eggs (optional).
3. Lightly get your paper wet. (I like to apply the water using a paint brush).
4. Add your bleeding tissue paper squares. (Note: You need specific tissue paper that is labeled as “bleeding” or the colors will not appear on your eggs).
5. Add more water on top of the tissue paper if needed.
6. Allow the eggs to dry and then remove the tissue paper.
7. Create an Easter basket or nest using brown paper (I like Kraft paper.)
8. Glue your eggs into the basket or nest!

Create adorable birds using ripped paper

Materials:
Colorful printer paper
Glue stick
Craft feathers
Googly eyes
Steps:
1. Cut a circle out of paper. (I used cardstock for extra durability.)
2. Rip colorful paper into small pieces. I used shades of yellow/orange to create a chick. And shades of blue to create a blue bird. But you can use any colors!
3. Use a glue stick to adhere the ripped pieces of paper to the circle.
4. Create a beak and feet out of orange or yellow paper and glue to your bird.
5. Add googly eyes.
6. Add feathers for wings!