
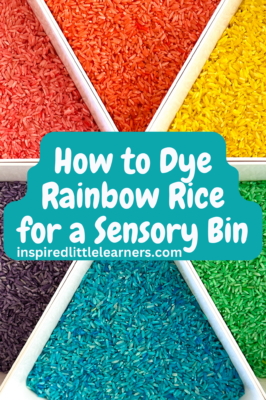
How to Dye Rainbow Rice for a Sensory Bin.
Making Rainbow Rice is extremely fast and easy and can provide HOURS of entertainment for your little learner! No joke that sensory bins are one of my kids’ favorite activities. Even my oldest son (who is currently 6) LOVES playing with a sensory bin.
Rainbow Rice is one of my all-time FAVORITE sensory bases and it was the first sensory filler that I introduced my kids to.
I love that it’s easy to make, inexpensive, easy to cleanup and lasts forever!
Read below to learn exactly how easy it is to make this taste-safe sensory bin filler!
This post may contain affiliate links. As an Amazon Associate and participant in other affiliate programs, I earn a small commission on qualifying purchases (at no additional cost to you). Thank you for your support! Read our disclosure policy here.
To Make Rainbow Rice
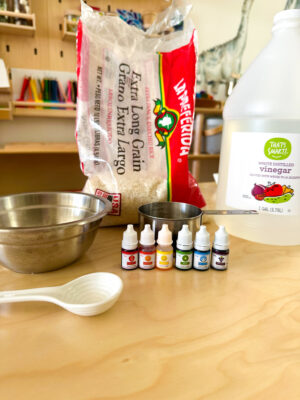
Materials:
1 cup uncooked rice
1 tablespoon white vinegar
Food coloring drops
Bowl (or Ziptop bag)
Spoon for mixing
Trays to dry the dyed rice
Steps:
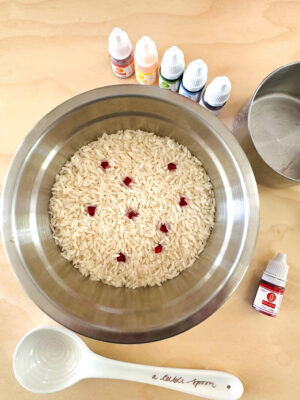
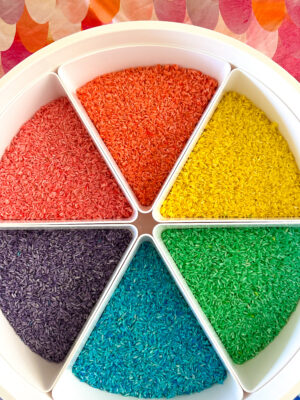
1. In a bowl, mix 1 cup uncooked rice, 1 tablespoon white vinegar* and food coloring drops.
– I recommend using 5-10 drops of food coloring. You can always add more food coloring, if needed. I do not recommend adding too much food coloring, because the more more you add the more likely there will be dye transfer during play. When using 5-10 drops of color, I never have dye transfer, as long as the rice is completely dry before play.
– Instead of a bowl, you can also use a Ziptop bag.
– *Vinegar helps to distribute the food coloring and also sets the food coloring, so the color does not transfer.
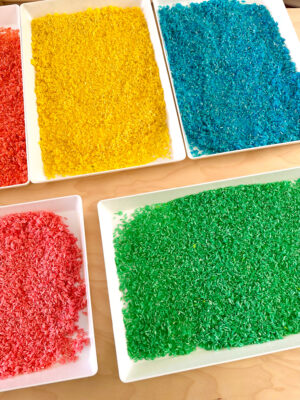
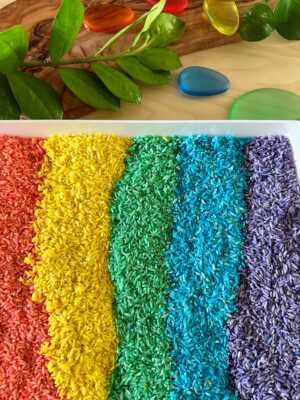
2. Once the color is evenly distributed, lay the rice on a tray to dry.
– I love these trays for drying and they can also be used as a tray during sensory play! You can also dry on a baking sheet. You can lay down parchment paper if you want, but it is not needed.
– The rice usually takes about 15 minutes to fully dry. You can mix the rice during the drying process to break up any clumps and to speed up the process.
3. Repeat the steps above to create as many colors as you want.
4. Once the rice is dry, it is ready for play! Place the rice in a sensory tray (we love how deep this one is), provide a scoop and a small bowl for transferring and let your child explore and have FUN!
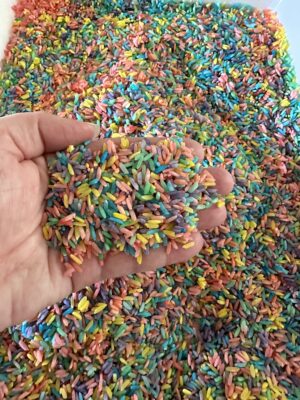
5. After play, the rice can be stored in jars or Ziptop bags to be used over and over again!
How to Make a Sensory Bin with Rainbow Rice
When introducing sensory play to young children, I recommend keeping it simple!
Place the rainbow rice in a tray or bin, provide something to scoop the rice with and something to scoop the rice into. I generally like to use deeper trays, because it can help contain the mess (especially as a child is scooping). For scooping and pouring tools- look in your kitchen! A serving spoon, a small plastic bowl, and a measuring cup make great tools for sensory play!
As children get older, you can start introducing more items into the sensory bin, like small figurines or other toys and often your child may have their own ideas of favorite toys that want to play in the sensory bin!
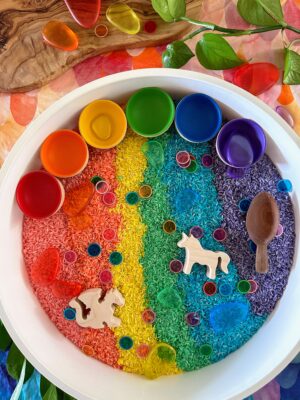
This photo shows an example of a sensory bin with wooden figurines, small rainbow bowls, rainbow pebbles, and magnetic chips! For children over the age of 3 (and children who are not mouthing items), magnet play can be a fun addition to a sensory bin. My kids love collecting the magnetic chips using a magnetic wand. Providing the small colored bowls and colored pebbles are a great way for them to practice color sorting!
Introducing Sensory Play
Is rainbow rice taste-safe?
When dyed using food coloring, rainbow rice is a taste-safe sensory base. This means that for a young child who is still mouthing items, it is not harmful for them to put the rainbow rice in their mouths. But an item can be “taste-safe” and still not something you want your child to eat by the handfuls.
Tips for introducing sensory play
Even when something I am using for sensory play is taste safe, I discourage my children from eating it. This helps the child learn that items for play are not to go in their mouth and they can generalize this rule to other items that are not taste-safe.
This looks like a gentle verbal reminder “That is not for eating.” … “We don’t want to put that in our mouths.” … “Yucky.” You can also gently move their hands away from their mouths and then model for the child how they can use a tool to scoop and pour rice.
When possible I set up sensory play in an area that is separate from where they eat. For example, I may set it up in a sensory bin on a small table in the playroom or in a tray outside. Setting up sensory play in an area that is away from where the child eats (for example, their high chair) can help the child learn to distinguish between things for play and those that are for eating
Benefits of introducing sensory play
There are lots of benefits to sensory play, including:
– strengthens neural pathways in the brain
– develops fine motor skills
– develops social skills
– supports language development
– introduces new/different textures
– builds concentration
– demonstrates cause and effect
– acts as a calming activity
Happy Playing!
I hope you can try making your own Rainbow Rice for sensory bins! The process is really very simple and your kids can also help with the process! Let them choose what colors to dye the rice, let them scoop and measure the rice, pour the vinegar and mix the food coloring in!
In addition to using the Rainbow Rice for sensory play, you can also use it for crafting! Apply white school glue onto cardboard, cardstock or construction paper and let your child sprinkle on some dyed rice. The rice adds a fun texture to your art!
You may also enjoy this post:
How to Dye Popcorn Kernels for a Sensory Bin